It looks like Demonspawnmom won the two hairclips! Yay for Demonspawnmom!
Stay tuned for a great Sugar Skull makeup tutorial that I'll be photographing tomorrow!

30 October 2010
26 October 2010
Bad Zombie Crafter, Bad!
Sorry I haven't updated, guys! I recently started a new and totally awesome job, working with one of my most favorite crafty people ever, so I've been busy training and subsequently, being tired. My computer is still broken, too.
Anyhow, I'll be back very, very soon with the winner of the giveaway as well as some awesome Halloween craft links.
Anyhow, I'll be back very, very soon with the winner of the giveaway as well as some awesome Halloween craft links.
05 October 2010
Cute Skull Hairclip Giveaway! Free stuff!!
October is my favorite month. Of course, Halloween plays a big role in this, but I just love everything about this month. I live in California, but I am not a huge fan of hot weather. Don't get me wrong, I love warm weather, but I just can't stand some of the highs during the summer around here. That's why I love October. October is when the leaves start to change colors, the evenings start falling sooner, and all these yummy foods start popping up. Pumpkin pie is one of my favorite foods of all time, and it starts making it's appearance right about now. Oh, yeah, and Halloween.
I love dressing up for Halloween, or for all of the pre-Halloween costume parties that start popping up. actually, I should say that I love playing with make-up. For years now, my costumes have consisted mainly of clothing I have thrifted or already owned, and some sort of wildly theatrical make-up or zombie makeup. Ummmm .... I'm getting sidetracked.
The whole reason I wanted to post today is that in honor of my favorite month, the lovely October, I have decided to have a giveaway. My first giveaway ever. I'm growing up so fast.
Do you remember the cell phone picture tutorial I posted on how to make bows? Well, I'm going to give away two (2) of those cute hair clips. In case you can't tell, one is vintage pink gingham and the other is black with white polka dots. Each features a cute little skull in the center.

RULES:
- Leave a comment with your email address, Blogger ID works too. This counts as one entry.
- Like the The Zombie Crafter page on Facebook. Come back here, and leave a comment saying that you did it. This counts as a second entry.
- The deadline for entry is 11:59 PST on October 14th, 2010.
- One entry will be chosen at random by a random number generator as the winner and will be announced no later than October 19th, 2010.
Polymer Clay Skull Cane : Tutorial Link

Do you remember Corvis tristis? Remember that awesome tutorial for making eyeball canes? Well, she's got another really awesome cane tutorial that I highly recommend you check out. All you need to make this lovely little skully is white and black polymer clay, a toothpick and a blade, and some sort of way to roll out your clay (like a pasta machine or a glass). Be warned: caning is addictive! It's freakishly easy and the results are awesome. You can put these little bad boys on just about anything - from jewelry to candle holders to boxes to your neighbor's dog. Ok, maybe not the dog, I might be exaggerating there. But yeah, go check out that damn tutorial!
22 September 2010
Ticker Tape Quilts = Totally Awesome
Have you heard of Ticker Tape Quilts? Well, they're just about the coolest things ever, in my 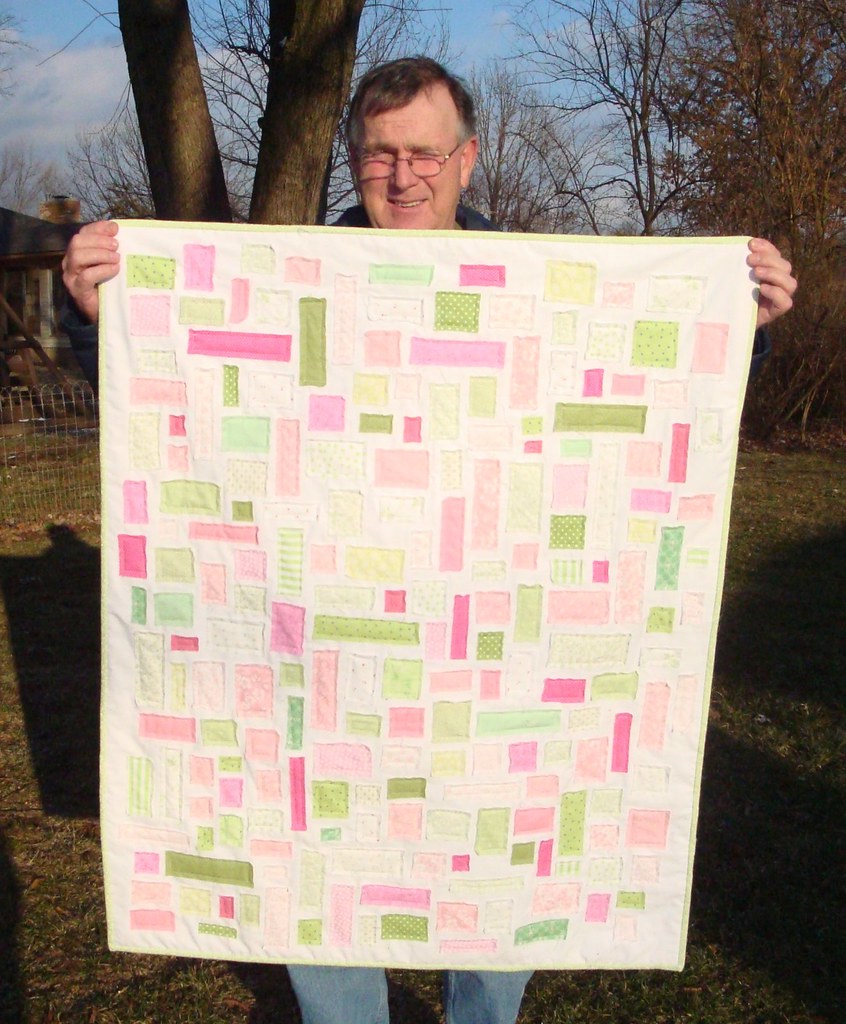 opinion. I've always wanted to try my hand at quilting, but the thought of cutting out hundreds of squares and triangles gives me a headache. I love the raw edges and the fact that it is made with scraps. Barely any cutting, since I already hold onto scraps like they're bits of gold. I think that ticker tape quilts and I are a match made in heaven. I've decided that I want to make one in all shades of turquoise and lime green, with a black background. I got really excited the other day, and wanted to get started. Sadly, i discovered that at some point I used up all of my black quilter's cotton and never got around to replacing it. I have yards and yards of black suiting, black jersey, black twill, black lining, all kinds of black fabric - but no plain black cotton! Sad face. So, it looks like I will have to put my ticker tape quilt on hold until I can scrounge up some cash for a Trip to the Fabric Store.


Sorry for the layout issues, by the way. I just can't seem to get the photos to cooperate. Also, the pictures are links to where I found them. In theory.
opinion. I've always wanted to try my hand at quilting, but the thought of cutting out hundreds of squares and triangles gives me a headache. I love the raw edges and the fact that it is made with scraps. Barely any cutting, since I already hold onto scraps like they're bits of gold. I think that ticker tape quilts and I are a match made in heaven. I've decided that I want to make one in all shades of turquoise and lime green, with a black background. I got really excited the other day, and wanted to get started. Sadly, i discovered that at some point I used up all of my black quilter's cotton and never got around to replacing it. I have yards and yards of black suiting, black jersey, black twill, black lining, all kinds of black fabric - but no plain black cotton! Sad face. So, it looks like I will have to put my ticker tape quilt on hold until I can scrounge up some cash for a Trip to the Fabric Store.Sorry for the layout issues, by the way. I just can't seem to get the photos to cooperate. Also, the pictures are links to where I found them. In theory.
19 September 2010
Eyeball Cane : Tutorial Link
I was on hiatus a bit after having minor surgery and a broken computer. I'm doing crazy better, sadly my laptop is still sick. Don't worry, soon I will buy a new housing and whatnot and after a bit of first time DIY computer repair, it should be right as rain again.

Anyhow, I thought I'd share a really cool tutorial for making a polymer clay eyeball cane that I found on the internetz. You can slice this cane and use it for all sorts of things. Basically, if it will hold still, you can put eyeballs on it. All you need to make these is polymer clay of just a few colors, a blade and toothpick, and some way to roll out the clay (like a pasta machine or a glass).
Well, what are you waiting for? Head over to Corvus tristis's blog for the tutorial!
P.S. On a completely unrelated note, I want a glass of milk very badly. VERY badly.
07 September 2010
Yay! I won something!

Last month, the folks over at Stickerella had a little contest in honor of H.P. Lovecraft's 120th birthday. If you don't know who H.P. Lovecraft is, you don't know horror. He is pretty much one of the most famous horror writers ever, inspiring many modern day horror writers as well as movies. Anyhow, Stickerella was giving away an H.P. Lovecraft themed decal, and I won! I chose their Miskatonic University decal. I can't wait to put it on my car! Head on over to the Stickerella Etsy store to grab one of your own. They also have tons more horror and nerdy themed decals.
03 September 2010
Skull Flower Hairclip: Text Tutorial

This hair clip is super easy to make, and super customizable.
All you need is polymer clay, fabric flowers, fabric glue, hot glue, a hair clip, and glitter.
A while back, I made about a dozen little skulls out of scrap polymer clay. They were kind of swirly mud colored, but that's okay because I knew I'd paint them eventually. They are super easy to make. I just formed a basic skull shape, then used the end of a paint brush to make the eye sockets and the back a craft knife to make the indents for the teeth.
For this clip, I painted the skull blue and sprinkled glitter on it while the paint was still wet. You could do the same, or use colored polymer clay.
I mixed a little fabric glue and glitter together and painted the edge of the petals with my fabric glitter glue. After it dried, I cut off the plastic bits in the center of the flower, leaving just enough to keep the flower together.
Next, I used my trusty hot glue gun to attach the skull to the center.
I then put a big blob of hot glue on the back to attach the hair clip. I like to use a lot so that it sort of envelopes the clip a bit, making it more secure.
01 September 2010
Coffin Shaped Glasses Case: Tutorial Link

I have tons of gas station sunglasses. Tons. Part of the problem is that I used to work at a gas station, so I got first pick on new shipments, plus a hefty discount on already cheap sunglasses. The other part of the problem is that I never seem to remember to bring sunglasses with me on road trips (which I go on fairly often), so I am forced to pick up a new pair. However, just because they are cheap doesn't mean that I don't feel sad when a favorite pair gets scratched or broken from hanging around in the bottom of the black hole that I like to call my purse.
That's why I was really happy to find a great tutorial for a case at one of my favorite crafting blogs, Crafting for Cheapskates. Not only is it functional, it's kinda creepy. I also love that she uses duct tape to secure the fabric, rather than pins. Those are the kind of short cuts I totally dig, hehe. Anyhow, head over here for a simple, straight to the point tutorial to make your own cute-but-creepy glasses case.
28 August 2010
Cubeecraft

Maybe I live under a rock, I dunno, but I've only recently discovered Cubees, and I really love making them. They are perfect for when I feel like keeping my hands busy, but am not feeling particularly creative. I can print a couple out, like the Aquateen Hunger Force set you see hanging out on my DVD shelf, throw on a DVD or some music, and get to cutting. The site says you don't need glue, but I still dabbed a little bit on each tab. The site has a ton of free printable Cubees, over 200 mostly nerdy pop culture characters as well as some designer originals created by guest artists. Head on over to the CubeeCraft website to check them out.
25 August 2010
Faux Old Books or Custom Book Covers: Tutorial Link

This tutorial shows you a great way to re-cover books. They would look perfect in your Wunderkammer, cabinet of curiosities, or for Halloween decor. It's also a great way to gussy up a plain, boring sketchbook.
The tutorial is easy to follow and calls for cheap materials that you probably already have laying around. All you need is an old book, cardboard, glue or Mod Podge, paper towels, and craft/acrylic paint. There are also plenty of clear pictures for reference.
23 August 2010
Fabric Hair Bow: Tutorial
 First, let me apologize for the quality of the photos. My camera is has been broken for some time now, so I've been using my phone. Secondly, this is the first photo tutorial, so I hope that it's adequate.
This is a great way to use up fabric scraps to make cute accessories.
You will need:
- Fabric
- Needle and thread
- Hair clip
- Hot glue gun + glue (optional)


1. Cut two rectangles from your fabric. The larger one should be twice as long and twice as wide as what you want your finished bow to be, plus a little extra for seam allowance. The second,
smaller piece should be twice the width of the center part of the bow and about two inches long.
2. Fold each piece in half, with the "wrong" side facing out. Sew along the open edge. This will create two tubes. I used orange thread so that it would be easy to see.
3. Turn the tubes inside out, so that the "right" side of the fabric is showing. Fold it so that the seam runs down the center of one side. You can iron the tubes at this point, but I'm lazy when it comes to things like that, so I didn't.
4. Fold the larger tube in half so that the seam is on the inside. Whip stitch the raw edges together. You can either iron it now so that the whip stitched seam is in the center, or do what I did and just kind of flatten it with your hands.
5. Fold and pinch the bow in the center, making it look the way you want, keeping the seam to the back.
6. Run a few stitches through the center, securing the folds.
7. Wrap the smaller tube around the center of the bow. Fold the raw edge over and secure it in the back with a few stitches. Your bow is now done!
8. Attach the clip to the back of the bow, using
either stitches or hot glue.
Variations:
- Layer your fabric with tulle, fishnet, or lace.
- Use less fabric by using pinking shears on the edge of the big tube. You only need to cut a rectangle of fabric twice as long, but the same width as the finished bow.
- Glue or sew a button or decoration to the center. I used Halloween favor rings with the ring part cut off.
- Embellish with embroidery, beads, or sequins.
21 August 2010
Space Invader Pop Up Card: Tutorial Link

Maybe you remember my post about Extreme Cards and Papercrafting? Yes, no?
Well, I wanted to tell you guys about a recent tutorial that recently popped up on her blog. That's right, kids. A Space Invader pop up card! Indulge your inner geek (or the inner geek of a loved one) by creating this awesome card. You can find the tutorial and downloadable PDF or DXF tutorial by following this link.
19 August 2010
DIY iPod Skins: Tutorial Link

I love to decorate anything I can get my hands on. I always joke that if it'll hold still long enough, I'll customize it.
That's why I was so excited to find this awesome tutorial on how to make your own custom iPod or mobile device skins over at Crafting For Cheapskates.
I have the iPod Touch, so I sadly can't really use this project for my iPod, but I do have a very sad looking Blackberry! This will also make a perfect birthday present, dontchyathink?
18 August 2010
Playing Card Messenger Bag: Tutorial Link

I found this easy to follow tutorial at Crafty Mommy and Me on how to make a trading card purse using materials you may either already have at home, or can easily be purchased at the dollar store. All you need are purse straps, sticky vinyl, and playing or trading cards.
She uses World of Warcraft cards, but I'm thinking that this would be equally as awesome if regular ol' playing cards were used. This project really makes me wish that I hadn't accidentally trashed my old Garbage Pail Kids collection. This project would also work really well for wallet sized photos, paint chips from the
 hardware store, or any other small rectangular or square bits of cardstock or paper. You can easily adapt this tutorial to make makeup bags or small purses.
If you're really feeling adventurous, why not try putting in a zipper? Just remember that once you stitch vinyl, there is no going back - those holes are there foooreeeveer. Also, make sure that you use the correct needle, feet and stitch settings for vinyl. Since this project uses adhesive vinyl, your needle can get gunked up pretty quickly, so keep a little rubbing alcohol and some cotton swabs handy to clean that needle off.
15 August 2010
Specimens for Your Bottles: Parasitic Worms

The good folks over at Propnomicon
have provided us with yet another great tutorial relating to creepy things in bottles. This tutorial shows us a very cheap and easy way to make parasitic worms out of liquid latex. A huge mess of these would look wonderfully creepy floating inside a dingy specimen jar, don't you think? You could also add a tiny bit of acrylic paint to the latex to give your parasites some color.
I find nothing more disgusting and interesting, at the same time, as parasitic worms. They repulse me, but I can't help but want to know more about them! If parasites are as fascinating to you as they are to me, I suggest checking out Animal Planet's show Monsters Inside Me.
13 August 2010
Bottled Specimens: Version II

Previously, I wrote about creating your own bottled fetus. I also wanted to share another tutorial with you guys on how to make another type of bottled specimen. This time, rather than a fetus, it is a 'mystery specimen.' The tutorial is very clear and concise, with plenty of photos. The author has even included a link to a printable label for your jar (which Lovecraft fans will get a kick out of).
The author discusses things that they would have done differently at the end of the article, such as making the preserving liquid less dark, which I agree completely with. While the darkness and dinginess of the preserving liquid makes it harder for the observer to identify it's contents, it also makes it hard to tell if there is anything in there at all. I do think that sealing the bottle in wax is a great idea, and will have to try that out. I think it lends a bit of a more authentic touch to the whole project.
06 August 2010
Miniature Mummy: Tutorial Link

Now, this tutorial is actually for a mummified fairy. I am not exactly the biggest fan of mythological creatures, but I still think that the finished product is totally rad. Personally, I would leave out the wings and fairy accessories, but I still think that it would fit nicely on a shelf next to your bottled specimens and mounted insects. The photo I have included in this post is of the mummy before the author of the tutorial added the wings. The tutorial is nice and clear, very simple, and includes plenty of pictures.
Perhaps you could use this tutorial to make a mummy for a faked freakshow exhibit, similar to this absolutely amazing freakshow prop over at Curiomira.
05 August 2010
Beware of Zombies Cross Stitch
 There are three things in life that make me very happy. Okay, there are more than three things that bring me joy, but only three of those many things pertain to this post. These three joyous things are:
- Crafts
- Zombies
- Free stuff
04 August 2010
Zombie Defense Kit - Tutorial Link

Are you prepared for the zombie apocalypse?
This is a very serious question, my friends. One that you must ask yourself and your loved ones.
There are many essentials that may come to mind when preparing for a zombie attack, such as a military vehicle, a fortress, etc. However, the most important item is actually a basic weapons kit.
Craftster user KCBlueGal gives us a great text tutorial on how to make a basic zombie survival kit.
Bunny in a Bear has probably created the coolest ever DIY zombie survival kit I have ever seen. Ever. I highly suggest checking out his kit. Just be warned that you will probably be so impressed that you will fall out of your chair. The case cover doubles as a sheild, my friends, a sheild!
FriendlyNeighbourPsycho has their own version, or rather, versions which can also be found on Craftster over here.
03 August 2010
Bottled Specimens: Tutorial Link

I've always loved the look of a shelf lined with bottled specimens. I really don't know where this strange interest came from, but whatever. I know that they creep a lot of people out, but my love of all things biology and all things macabre make me want a whole cabinet in my home filled with them.
I would love the real deal, but I will have to settle for fakes. The plus side of creating your own fakes is that you can make either very hard to find specimens, or mythical creatures. I have a long standing love of birth defects and fetus mutations, as well as all things crafty, so DIY bottled specimens are right up my alley.
I have found a wonderful tutorial for faking a mutated fetus specimen, as seen to the right. It can be found here over at the Indy Mogul forums.
This tutorial uses all kinds of fancy materials that are not readily available to me, and is also meant for making many of the same specimen. You could use the concept of this very thorough tutorial to create your own one-offs using polymer clay.
01 August 2010
Zombie Art Quilt

When I first saw this art quilt by Craftster user Pearliepie, I was absolutely stunned. Personally, I hate quilting. I wish I could love doing it, but it's just too much planning. I'm a measure never, cut a thousand times type of gal. So, I have nothing but the utmost respect for quilters. Besides, this quilt is just awesome! Check out the original post on Craftster for more detail pictures.
22 July 2010
Child's Color Book Update

I finished the color book for my little little brother. The laminating sheet left little circle air pockets around the circles on the cover, but I think that it looks ok. I made the cover by using a standard hole punch to punch little "dots" out of glitter card stock. Have I mentioned yet that I love glitter? I know that a lot of people don't associate glitter with little boys, but all little kids like sparkles. When I worked at a kid's face painting booth, little boys would often ask for their Spiderman mask or scary serpent to have some glitter.


Extreme Cards and Papercrafting


I wanted to share with you guys this gem of a blog I found, called Extreme Cards and Papercrafting. The pop-up cards, movable cards, and 3-D paper crafts she does are amazing. She offers tons of tutorials and lessons, like this one on how to do pop-up words in your cards. She also offers downloadable patterns, templates, and various file types for your digital cutters.
One things that I really like about this particular blog is that the lessons are neatly organized and easy to find on the right side scroll bar. So many times, I will find a blog that is very informative or inspiring, but I will abandon reading it due to not being able to easily navigate through it.
If you are at all interested in paper crafts, or just feel like being wowed and amazed, I highly recommend checking out Extreme Cards and Papercrafting. I guarantee, money-back, that you will not be disappointed.
21 July 2010
Child's Color Book
 I was inspired to make my little little brother a color book after seeing a similar project in Craft & Home Projects. I didn't care much for their version, but I thought that it was a really cute concept. I thought theirs looked, I dunno, a little too handmade and boring.
I searched high and low on the internet for a template that had multiple large tags of the same shape and size. I found plenty of tag templates, but they were of various sizes and shapes. So, I took an index card, folded it in half, and cut the corners off. I then traced the tag onto sheets of white card stock and cut them out. So far, I have the red, blue, yellow, and green pages mostly done. You can't tell from the picture, but some of the paper on the green one is glittery. I love me some sparkle! I swear, if it will hold still long enough, I'll cover anything and everything in glitter. As long as these pages don't end up too thick, I may use some sticky laminate pages to laminate these, since it is meant for a three year old. Stay tuned for the completed project!
Patchwork Scrap Scarf: Tutorial Link

If you are at all like me, you just can't bear to throw those scraps of fabric away. You know the ones - they are just a few inches square, but you LOVE that fabric and can't seem to find it anywhere anymore! Or how about that three inch wide strip you cut off of that skirt when you hemmed it up? The fabric was just so pretty! All those scraps may have been sitting in your scrap box for two years, but you just know they will come in handy one day. How could you throw them away?!?
I am always in need of projects that use up those little scraps, I really cannot throw them away. I've found a lovely photo tutorial over at Javajem's blog for these adorable and thrifty scarves. I know that it isn't quite the season for scarves yet, but it never hurts to get started early on that holiday crafting. In my world, the week leading up to Christmas is filled with a mad dash to finish crafting, visit family, and a crap-ton of baking. It doesn't help that my birthday also happens to fall on December 25th. This year, I vow to actually have some time for myself, which is why I'm already looking into some winter crafts.
Head over here to see the step-by-step photo tutorial that Jody has been kind enough to share.
I plan on making a dinosaur scarf for my little little brother and a gray + black one for my big little brother. Maybe I'll have to make one for myself using all those different colored leopard print scraps I have in my scrap box.
20 July 2010
Felt Chips + Sandwich: Free Pattern Link

I have always loved to make felt food, but I felt kind of silly doing so because I have no actual use for them. I live in very cramped quarters, so sometimes crafting just for the sake of crafting cute things makes these quarters even more cramped. Luckily, three and a half years ago, my mom gave me a second little brother. Now, making felt food has become practical!
Anyhow, I came across this wonderful free pattern for a totally cute bag of chips and sandwich with all the fixings over at Snazzle Craft.
You can find the pattern and instructions here. She even tells you how to put ridges on your chips so that they look like Ruffles. I think it would be really cute idea to monogram the label on the chip bag, don't you think?
05 July 2010
First Post
I thought that I might make my first post an introduction. Makes sense, right?
I am 23 years old and have been crafting for as long as I can remember. My grandmother taught me how to crochet, my mother taught me how to embroider, my dad taught me how to draw, and I've gotten myself into just about everything else by utilizing the internet and local book stores. I dabble in a bit of everything - paper crafts, crochet, embroidery, polymer clay, sewing, jewelry making, resin casting, you name it and I'd love to try it!
I've also always enjoyed writing. For part of my high school career, I had the opportunity to have my curriculum based on my interests. Subsequently, I ended up accumulating fourteen different English classes! I also had the wonderful title of Co Editor for my high school newspaper, which was a wonderful (and stressful!) experience.
Because books can be so darn expensive, and because I can't read and craft at the same time, I enjoy listening to audio books while I craft. Recently, I have been on a massive Philip K. Dick binge. I've listened to A Scanner Darkly at least four times over the past couple months! I also love John Steinbeck, George Orwell, and Chuck Palahniuk, among others.
I love horror films, especially zombie movies, so a lot of my crafts are heavily influenced by this genre. I also enjoy watching films that are based on books, such as One Flew Over The Cuckoo's Nest. Stephen Kings movies rock my socks, especially The Stand.
I have one pet rat name Lucky. I generally call him Mr. Lucky Rat or Mr. Rat Man. I have had as many as eight rats at one time! I love animals of all sorts, but am definitely most fond of cats and rodents. I do love dogs, though, and am currently hoping to pursue a career as a pet hygienist and stylist (fancy talk for groomer and teeth cleaner!) and eventually become a veterinarian technician.
Well, that's all for now! I look forward to sharing my crafty finds with everybody.
Get inspired!
Subscribe to:
Posts (Atom)